I recently saw a question on The-Social-Media-Platform-Formerly-Known-As-Twitter asking about how people prepare for preaching a sermon. I wrote a short Twitter-esque reply, but thought it was worth a fuller treatment, in case either anyone is interested, or that it may even be helpful!
TL;DR
Know the context
Marinade in the scripture
Draw up a draft
Practice and refine
Pray and seek God at every stage!
And read these books:
“Misreading Scripture with Western Eyes” by Randolph Richards and Brandon O’Brien (IVP 2012)
“Short Stories by Jesus: The Enigmatic Parables of a Controversial Rabbi” by Amy-Jill Levine (HarperCollins 2015)
“Talk Like TED: The 9 Public Speaking Secrets of the World’s Top Minds” by Carmine Gallo (Macmillan 2014)
Know the context
My first step, as with any talk or presentation, is to establish the context. What sort of service is it? Who will be present? How long should the sermon be? Is there a particular theme? Is the Spirit been on the move in a certain aspect of the church? Is there a “party line” from the church leadership? At what point in the service is the sermon?
Some of these are potentially contentious or controversial, depending on your theology. For example I have a certain ambivalence to thematic preaching, as it’s very easy to squash in a token bible reading to fit what you want to talk about. I also think it assumes a pattern of church attendance (i.e. every week) which doesn’t always match up to the reality.
However I am also a firm believer in operating under authority, especially as an Associate Minister, and I will always seek to publicly back up the vicar/PCC. Of course, this is not blind or unqualified support – particularly thinking about the church’s history on abuse, most recently in the case of Soul Survivor and Mike Pilavachi. It also doesn’t mean being a “yes man”, and in private I will challenge and debate where I think we may be missing the mark. Anyway, I digress.
As some concrete examples, think of how sermon preparation would be different for these contexts:
A “normal” Sunday Holy Communion of 5 regular, committed, church members.
A “normal” Sunday Holy Communion of 150 regular, committed, church members.
A seeker service
An early morning service, with a 5 minute homily
An evening service, with an hour’s exposition on a bible passage
A funeral
A family service, with ages from 0 to 100+ present
A youth or student worship service
A sermon during an act of worship at a theological college
A prison
A school
… and so on
Reflection on the context should help to answer questions around:
The length of the sermon
The language to use
The depth of the content / theological assumptions
What level of interactivity
What props to use
Whether to use a PowerPoint type presentation
What form an application or response might take
What sort of humour/stories may be appropriate
What sort of humour/stories wouldn’t be appropriate
Marinade in the scripture
I try to start to think about the sermon at least two weeks before I’m preaching. I like to read the passage (or identify the theme) and mull it over. I try to come to it with fresh eyes – is there anything I’m skipping over. What are my cultural filters?
At this point I have to recommend a couple of books; “Misreading Scripture with Western Eyes” by Randolph Richards and Brandon O’Brien (IVP 2012), and “Short Stories by Jesus: The Enigmatic Parables of a Controversial Rabbi” by Amy-Jill Levine (HarperCollins 205). The second in particular isn’t very comfortable reading, but both certainly opened my eyes to some of the assumptions I (and our churches) make when reading scripture.
I sometimes do a lectio divino on the passage, to see what the Spirit might want to draw my attention to. Even if I’m not, I try to settle myself, ensure I have some quiet time and space, and just sit with the passage for a while, reading it over and praying through it.
I will sometimes dig out a commentary at this point, and will also reflect on resonances with other parts of the Bible. I will start to muse over whether there’s anything I’ve read which speaks to this passage. I will think about what quotes there might be. Or personal stories from my own life. I also start to keep my ears open for anything I come across which speaks to this passage. The internet has been a God-send for this, as I will often think “H’mm – I read something in Church Times about that”, and I can go and search it up.
As a slight aside, I keep a sermon scrapbook, and whenever I come across something which speaks to me in a newspaper or magazine, I cut it out and stick in the scrapbook. A lot of it I will may never use. My only tip is to make sure that you’ve either included the reference in the cutting, or write it alongside in the scrapbook.
Draw up a draft
This is probably what most people think of as writing a sermon. Turning the thoughts and musings into something ready to speak.
At this point I am just downloading ideas and following trains of thought, so see what emerges. I might identify areas I need to do a bit of research, have a look at different translations, read a commentary, maybe even dig into the Greek or Hebrew if I get very excited. Try and identify parallel passages.
The next step for me is to start to shape it, and how I do that depends greatly on the context. If it’s a ‘normal’ Sunday service I usually identify 3 major themes or points, each of which has 3 sub-points. I don’t necessary explicitly identify these when preaching, but I can hold 3×3 elements in my head, so can preach it with minimal notes. I quite like the following quote – I don’t know who said, and it’s far from the whole story, but it’s an interesting thought.
If you can’t keep your sermon in your head, how do you expect other people to?
This approach/structure comes from one of my favourite books on public speaking, “Talk Like TED: The 9 Public Speaking Secrets of the World’s Top Minds” by Carmine Gallo (Macmillan 2014). Once you get to longer than 10 or 15 minutes this technique runs out of steam a bit.
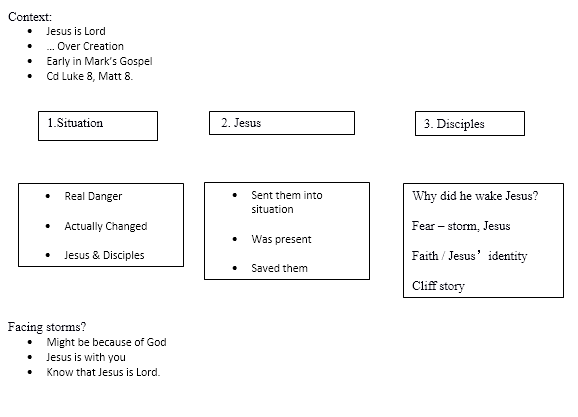
My notes when I’m using this technique look like this (for a sermon entitled “Jesus is Lord: Over creation – Mark 4:35-41”)
Another approach I’ve been experimenting with recently is sketchnoting, which is sort of like inverse note taking. This is much more of a journey, and is (obviously) far more visual than either a full script or the TED-like approach.
This ends up looking something like this:
Finally, if I get completely stuck, or is it a service where the language or timing is critical, I do write out the entire script verbatim.
So this is the opening of my sermon for our 2018 Remembrance Day service.
Pour out jug of sand
Never Again.
These were the words spoken one hundred years ago today, as the Armistice was declared, marking the end of the first World War. Of course at the time it wasn’t the first world war – it was The Great War – The War To End All Wars. And Never Again would future generations have to face the horror and pity of war.
Never Again.
And yet, just twenty years later, the world was at war again. Even today, UK armed forces are deployed around the world, and involved in ongoing wars in Iraq and Afghanistan.
Never Again?
In the great war, over 900,000 British soldiers died. Nine Hundred Thousand. That’s about the same number of grains of sand that I poured out when I first came up. Each individual grain of sand representing a British solider who died.
But of course, that’s only British soldiers. 10 million soldiers died in all.
Pour out rest of sand
…
Practice and refine
By this point I have the essence of the sermon.
What I do now is practice it – I mean literally shut myself in a room and deliver it. Make sure the timing is right. Make sure I know how I’m starting and ending it. Work out exactly how I’m going to tell that story, or assess if that joke is going to work. See if there’s bits which need to be cut or expanded upon. Try and form it into a cohesive whole.
Of course, if you are using a script, this is the editing phase of the script. But if I’m not using a script I rehearse it in my mind often right up to when I actually stand up to preach. Choice of phrase. Pause points. Which bits to repeat for emphasis.
For me, this is very much about the delivery.
In general terms, the longer the sermon the less “tight” it has to be. So if it’s an hour exposition, I will probably not rehearse it the whole way through, but will make sure I know what I’m saying for every verse, and then play it by ear on the day. For a ten minute sermon, I reckon you need to know the exact message and phrasing if you’ve any chance of keeping to time.
Incidentally don’t shy away from ruthless editing. My spiritual director once told me that he writes his sermon on Monday, sets it aside for the week, and then picks it up again on Friday and deletes half the words!
Pray and seek God at every stage!
This should go without saying – but ultimately preaching is huge privilege, and we’re seeking to share God’s heart with the congregation. That is an awesome responsibility, and not to be taken lightly. Throughout my entire sermon prep my dual prayer is “God help me”, and “may these words be your words”.
I hope that it is never my message when I preach, but God’s message through my words. Bishop Helen-Ann Hartley (now Bishop of Newcastle) once prayed this at the start the start of one of her sermons, and it has really stuck me with. It’s from memory, so is almost certainly a paraphrase.
May the written word and my spoken word bring us to you the living Word, Amen.
When I first migrated to using next.js as my front-end, I used the WPGraphQL plugin to fetch data from WordPress.
GraphQL is really nice – especially the facility to tailor queries and include related data – but on WordPress it seems really slow. Obviously I am running WordPress on massively underpowered hardware, but it was taking 30-40 minutes to statically build the site, and maybe 10+ seconds to return dynamic pages, such as search results.
So, I’ve got rid of WPGraphQL, and am now using the standard REST API (with some extensions). The static build is down to about 10 minutes, and search results are back in ~4 seconds (still slow, but acceptable).
One side effect is that I’ve had to change how the paging works, so it’s a more traditional Page 1 of 10 type approach, which a page navigation at the bottom. New pages load in about 2-3 seconds, which is ok.
I’ve also finally removed my custom theme and related plugins from the back end, which should have also sped things up a bit.
I’m also re-working the categories and tags, as they’re a bit of a mess at the mo, but with 800 odd posts to review it may take a while!
I recently blogged about my e-mail backup strategy, using imap-backup. However I’ve found in real life this tool trips up quite a lot, and doesn’t really sync very satisfactorily on an ongoing basis.
It’s also been slightly nagging at me that I’m just mirroring – so if an e-mail is deleted it’s gone for good once the next backup has run. But equally I didn’t want to have to backup the whole shebang every time.
So, the solution I’ve reached is a combination of offlineimap and my old friend restic to do incremental backups securely and efficiently. The restic repository also goes up to good old sync.com, which is potentially a bit of duplication – but I wanted the snapshot capability (rather than individual file histories).
Basic workflow is
Use offlineimap to mirror the imap server into local maildir folders
Use restic to take a snapshot of the maildir folders
Of course, this is all done using Docker containers. So step one uses a volume within the docker container, step 2 uses a local filesystem mount for the restic repository.
Dockerfile
Pretty standard – install offlineimap and restic, then copy across the config file to ~/.offlineimaprc. Worth saying that ~/.offlineimaprc has passwords in it, so this image shouldn’t be published anywhere!
FROM ubuntu:latest AS build
ENV HOME /root
SHELL ["/bin/bash", "-c"]
RUN apt-get update && apt-get -y --no-install-recommends install \
offlineimap ca-certificates restic
RUN update-ca-certificates
RUN adduser --system --uid 1000 --home /home/imapuser --shell /bin/bash imapuser
RUN mkdir /imap-backup && chown imapuser /imap-backup
USER imapuser
ENV HOME /home/imapuser
WORKDIR /home/imapuser
COPY --chown=imapuser offlineimap.conf .offlineimaprc
RUN chmod 0600 .offlineimaprc
CMD ["offlineimap"]
.offlineimaprc
Best off reading the docs, but this is what I had to do to get it working nicely. Looking at it again now, the windows stuff and nametrans may no longer be required, as I originally used a mounted windows volume rather than a native docker volume for this step.
Of course you can add as many accounts as you want.
This is slightly more involved. I’ve got the best outcome when I sync each account individually. This script spins up a docker container for each account in turn, with a named volume mount called offlineimap which stores the local maildir (so it persists between runs). Then it spins up a final docker container to do the restic business.
That last line is a bit more involved it has to mount two volumes – the offlineimap as above, but then a Windows folder on my host PC mounted at /restic which stores the restic repository. This Windows folder is one managed by sync.com. As you can see, I needed to add some extra bits and pieces to the restic command to get it to do the incremental backup properly with a mounted windows volume.
docker container run --rm -v "offlineimap:/imap-backup" ^
offlineimap offlineimap -q -a account1
docker container run --rm -v "offlineimap:/imap-backup" ^
offlineimap offlineimap -q -a account2
docker container run -e RESTIC_PASSWORD=****** --rm -v "offlineimap:/imap-backup" ^
-v "C:/Users/james/Backups/email/offlineimap/restic:/restic" ^
offlineimap restic --ignore-inode --cache-dir=/imap-backup/.cache ^
--host=offlineimap -r /restic backup /imap-backup
In action
The first run is slow, as it has to download entire mailboxes, but thereafter it’s only a few seconds per account.
The abridged log output is shown below. The numbers won’t add up as this is from one of my actual runs, which syncs 6 or 7 e-mail accounts.
OfflineIMAP 8.0.0
Licensed under the GNU GPL v2 or any later version (with an OpenSSL exception)
imaplib2 v3.05, Python v3.10.6, OpenSSL 3.0.2 15 Mar 2022
*** Processing account account1
Establishing connection to imap.somewhere.com:993 (Account1Remote)
Syncing Drafts: IMAP -> Maildir
Skipping Drafts (not changed)
Syncing Sent Items: IMAP -> Maildir
Skipping Sent Items (not changed)
Syncing Spam: IMAP -> Maildir
Skipping Spam (not changed)
Syncing INBOX: IMAP -> Maildir
Copy message UID xxxx (1/2) Account1Remote:INBOX ->Account1Local:INBOX
Copy message UID xxxx (2/2) Account1Remote:INBOX ->Account1Local:INBOX
*** Finished account 'account1' in 0:06
OfflineIMAP 8.0.0
Licensed under the GNU GPL v2 or any later version (with an OpenSSL exception)
imaplib2 v3.05, Python v3.10.6, OpenSSL 3.0.2 15 Mar 2022
*** Processing account account2
[...]
*** Finished account 'account1' in 0:01
using parent snapshot 25d4e6dd
Files: 68 new, 9 changed, 39759 unmodified
Dirs: 0 new, 49 changed, 1464 unmodified
Added to the repo: 5.871 MiB
processed 39836 files, 3.893 GiB in 0:02
snapshot ebd8f443 saved
One of the things us evangelical Christians like to do is to take a small passage of scripture and hang an entire praxis on it.
This gets us into a bit of trouble sometimes, for example:
I do not permit a woman to teach or to assume authority over a man; she must be quiet.
1 Tim 2:12
This was (presumably) fine for the specific context Paul was writing to, but applying it as a global practice for all time doesn’t really stand up against the weight of the rest of scripture regarding the place of women in the Kingdom of God (and the church). I recognise that others see it differently.
But scripture always asks us a question, and demands a response, which is good and right.
Another passage evangelical churches particularly like is the so-called “five-fold ministry” from Ephesians.
So Christ himself gave the apostles, the prophets, the evangelists, the pastors and teachers, to equip his people for works of service, so that the body of Christ may be built up until we all reach unity in the faith and in the knowledge of the Son of God and become mature, attaining to the whole measure of the fullness of Christ.
Ephesians 4:11-13
This “five-fold ministry”, also known as APEST (Apostles, Prophets, Evangelists, Pastors (or Shepherds), and Teachers) can be used as a way to check the balance of your church leadership. Are we strong on pastors, but don’t have any evangelists, for example?
I personally don’t think this bears an awful lot of theological weight – as I’ve already said we need to tread carefully with this sort of stuff. However I was having a conversation about this recently with my vicar Mike, and he told me a really good way of remembering APEST, which assigns a type of each digit on your hand from thumb to little finger, and goes like this (my interpretation):
Apostle – Thumb, because this is the only digit which can touch all the other fingers.
Prophet – Index finger, because this points out/at things God wants to draw attention to.
Evangelist – Middle finger, because this is the longest finger to reach out to people.
Pastor/Shepherd – Ring finger, because it’s all about relationships.
Teacher – Little finger, because this is the only one that can get right inside your ear
This isn’t a great hermeneutic – but it is a neat way of remembering this passage, and I am all for memorising scripture!
I’ve been meaning to write something about passwords, and password managers for ages.
TL;DR
Passwords need to be as long as possible, and no fewer than 15 characters.
Never re-use the same password on different sites.
Always use 2FA where it’s offered.
Use a password manager like bitwarden to do all the above!
There really is no excuse these days for having poor password hygiene, such as re-using passwords, using easily guessable or crack-able ones, not changing them periodically. A good password manager makes life incredibly easy – I no longer know what most of my passwords are, because bitwarden looks after them all. It integrates with my browser, and with my phone, and gives me excellent passwords and (with a paid plan) 2FA for all the sites I use.
I use a paid plan with Bitwarden to get the premium features like 2FA, analysis tools, and sharing passwords with multiple users. The free plan is also really good though, and I started off with that. At time of writing, the individual paid plan is $10/year, but the families plan (which I have) is only $40/year, which lets me and 5 other users join my ‘organisation’ and get password sharing and the premium features. They otherwise all have free Bitwarden accounts.
Passwords
First of all, why do we need good passwords? Fundamentally we need good passwords because there are crackers in the world who want access to your account/data/money/… They may do this by guessing the password, or getting you to tell it to them, or by stealing the login database/buying it off the dark web. If we have decent passwords, the first two should be avoidable – but sooner or later a database with your password in will be compromised.
Thankfully the days of storing passwords in plain text in the database are long gone – after all it doesn’t matter how good your password is if it can just be read from the database! Instead, passwords are usually stored as a hash, which is a one-way encoding of the data. That it is say, it is impossible to work backwards from the stored hash to the original password. When you enter the password the first time, it is hashed and stored in the database. The next time you try to log in, you enter the password, which is hashed again, and the new hash is compared with the old. If it matches, you’re in!
As a very simple example, if you assign ‘a’ the value 1, ‘b’ the value 2, and so on, then a hash might be adding up all these values. So if the password is ‘aaab’, then the hash will be 5. It is impossible to start with the 5 and work back to ‘aaab’. Even if you know the password had 4 characters, you can’t tell if it’s ‘aaab’, ‘aaba’, ‘abaa’, or ‘baaa’. This strength is also a weakness, as any of these the passwords, as well as ‘baaa’, ‘bba’, ‘e’, ‘da’ all also hash to 5 – a so-called hash collision. This means if someone tried ‘e’, they would be able to log in, as it hashes to the same value.
In reality, hashes (or these days key-derivation function) are super clever and complex, so the chance of a collision is vanishingly low – and they are robust to analytical weaknesses (unlike our example above). We’re not completely out of the words though, because if you have the hash it becomes theoretically possible to crack passwords by brute-force. Trying out every combination of letters and seeing which one gives a hash match will reveal the password (or at least one which gives the same hash).
This is where password length and (to a lesser extent) complexity come into play. Modern computer hardware can generate hashes of all possible 8 or less character passwords in minutes, if the system is using an older hashing function. The same hardware will take decades to do the same for 15 character passwords.
In other words, waterhorselunch is a much stronger password than 7dYnV*fd. And also much easier to remember and type in, especially on a mobile device.
I would still say waterhorselunch has some analytical weaknesses – there are ‘only’ 200,000 words in English, so brute forcing all possible 3 words combos isn’t too hard. So spice it up with a separator, a number, and some capitals, and the password is good – Water|horse1|lunch. Still almost as easy to type in, but now not susceptible to a dictionary attack. Even better is 4, or 6 words.
Of course, if all always use waterhorselunch, or even Water|horse1|lunch, then as soon as it’s cracked once, the cracker can log in to all your accounts. So don’t do it!
Password Managers
It doesn’t matter how strong your password is if you either can’t remember it, or if you re-use it on different sites.
This is where passwords managers, like bitwarden, come in. Essentially they generate and store all your passwords for you. The only password you have to remember is the one to unlock the vault. Now when I log into LinkedIn, I click on my Bitwarden browser extension – LinkedIn is already shown, and a simple click populates my username and password.
Bitwarden will generate strong, long passwords, with a high level of customisation. You can also keep generating new ones until you find ones you like. And edit them further (so if a specific site needs a particular character, you can add it).
Here are some examples:
hatchback.unlovely5.dramatic
estrogen3.mushroom.satisfy
Alternatively, you generate ‘traditional’ passwords like WA2^^cbtooA5Vw2GdfMj7i2$roRxiPaupBmDUJq. But I know which I’ve rather have to type in using an PS5 controller!!
Bitwarden will also tell me where my details have been involved in a known data breach, and if I have re-used passwords, or am using passwords from a common list.
It’s worth mentioning that Bitwarden don’t have access to my passwords. They are encrypted with a very strong algorithm that is keyed on my master password, and it is only ever this encrypted data which is sent to/from their servers. The downside is that if I do ever forget my master password, or lose my YubiKey (see below), then I can’t access my passwords anymore. But equally that is kind of the point!
Two Factor Authentication
The other major weapon in the fight against crackers is multi-factor authentication (for our purposes two-factor authentication, or 2FA). The first factor is your password (something you know). The second factor is a code (generated by a device only you have). Multi-factor authentication is a whole subject in itself, but for most normal people it boils down to having to enter a time dependent code (usually 6 digits), either generated by an app (such as Google Authenticator), a piece of hardware (like the card readers banks used to use) or sent to you by SMS/e-mail. The latter option is a bit rubbish, as neither SMS nor e-mail are secure. 2FA is super secure because only the person with the device can generate the code, each can only be used once, and it changes every 30s so can’t really be stolen. Biometrics (fingerprint login) can also be a second factor.
The trouble with something like Google Authenticator though is that you need your phone (or whatever device it is on), and it’s a bit of a pain to be honest. Once or twice in the past I accidentally left my phone at home, and wasn’t able to log into the AWS Console at work as a result!
So I now use Bitwarden to store my authentication codes, which it does superbly.
This is slightly breaking the principle of 2FA, as there is arguably only one factor involved. If someone accesses my Bitwarden account, they have access to both factors (password and code). However, if my passwords are compromised outside of Bitwarden, then my accounts are still protected by the second factor. This is good enough for me, for the convenience of having 2FA protection without it being a pain for me.
I also have a YubiKey as 2FA on my Bitwarden account, so that even if someone does get hold of my master passphrase, they still can’t access my account. In that sense, it is kind of 2FA by proxy – you need the YubiKey, it’s just one step removed.
In my last post, I talked about the important of backing up, and how I do it. The upshot is I use a cloud file provider, which automatically synchronises my data, keeps a file history, and allows delete restore. There are many options here – I settled on Sync.com because it is zero-trust out of the box, is reasonable value, enables file and folder sharing, and generally seems good.
In the post before last, I outlined my website setup, which is a Linux box running a collection of Docker containers. Unfortunately Sync.com doesn’t have a Linux client or API yet, so I can’t directly use the same approach. Also, part of the backup is of the MySql database.
There is also a much stronger requirement for incremental backups – you want a backup every day, and the data probably hasn’t changed very much since the previous day’s backup. However, you may also need to go back several days or weeks to a specific backup.
This is very much like source control for code, which in fact I also use as part of the backup strategy.
TL;DR
I use cron to run a script which:
Does mysqldump of the databases to text files,
Uses Restic to make an incremental encrypted backup of these and the filesystem to my NAS and (via rclone) to Google Drive.
All the configuration, static HTML, CSS and so in is stored in a BitBucket.org repository.
Old school
Initially I had some very simple backup scripts, which did the following:
Create a dated backup folder on the NAS.
Dump the database into the folder.
Make a tarball of all the files.
Also mirror the files to a ‘live’ folder on the NAS.
This was ok as far as it went. It did need manual intervention to delete the old folders from time to time, and to copy to a USB stick occasionally. It’s pretty inefficient in terms of runtime and storage. Each backup takes up around 5GB (mainly due to all the photos on photo.eutony.net). It also doesn’t provide an offsite backup, so not really ideal.
Shiny and new
In my general overhaul of everything I decided I needed a new backup approach as well. It had to satisfy the 3-2-1 requirement, be fully automated, but also be elegant and efficient.
In my research I came across Restic, which ticks all the boxes. It is a encrypted, block-based incremental/differential backup system. So I can backup the the entire filesystem every day, but only the changes since the previous backup will be stored. Furthermore, a full history of the filesystem going to back to the first backup is retrievable. Restoring a particular snapshot will provide the entire filesystem at that point of snapshot.
In that regard, it is very much like a Git repository, just minus the branches.
The output from Restic looks like this:
using parent snapshot 6cc86ebd
Files: 0 new, 4 changed, 10136 unmodified
Dirs: 0 new, 11 changed, 723 unmodified
Added to the repository: 20.222 MiB (20.224 MiB stored)
processed 10140 files, 5.500 GiB in 0:46
snapshot 0b1c0bc4 saved
So you can see it’s processing 10,136 files across 734 directories in a 5.5 GB archive, and added 20MB for the 4 changed files. And all in 46 seconds.
This is all good and well for the file-system, but what about the database?
Well, I use mysqldump to write a plain text file of SQL to a folder that is including in the Restic backup. Actually I’ve got 3 databases, so it’s 3 files. The plain text obviously makes the individual files bigger, but it makes it easier for Restic for chunk it up, and only store the deltas, not the whole file.
Backup Storage
So Restic will roll up my backups into a nice snapshotted repository – but where does that live?
Well, in keeping with the 3-2-1 approach, I actually use two repositories. One is hosted on my NAS (Restic plays nicely with ssh, using sftp), and the other is on Google Drive.
“But wait”, I hear you say, “how to you access Google Drive from a Linux command shell – and anyway, didn’t you say you didn’t trust Google not to look at your data?”. Turns out both of these are simple to address, using Rclone to access Google Drive, and Restic’s built in file encryption.
Setting up Restic and Rclone was pretty straightforward, and the docs are good. I’ve done a single test restore, which went without a hitch. And my backup script verifies the integrity of the repository every day, and pushes the log file to my phone via ntfy.
So, in all it’s glory, my backup script, which is run from crontab every night looks like this. You will of course understand that I’ve removed credentials and network information.
#!/bin/bash
resticpw_file=/home/backup/.secret/resticpw.txt
log_file=/tmp/backup.txt
# Dump the MySql databases
mysqldump --opt --create-options --add-drop-table -h 127.0.0.1 \
eutony_net --default-character-set=utf8 >
/home/backup/db/eutony_net.sql
mysqldump --opt --create-options --add-drop-table -h 127.0.0.1 \
gallery3 --default-character-set=utf8 >
/home/backup/db/gallery3.sql
# Output the files to the log file, for validation
echo "**DB**" > $log_file
echo "" >> $log_file
ls -l /home/backup/db >> $log_file
echo "" >> $log_file
# Restic backup to the NAS
echo "**NAS**" >> $log_file
echo "" >> $log_file
restic -r sftp://[email protected]:/backups/pi/restic backup \
--password-file $resticpw_file \
/home \
/var/www \
--exclude ".git" \
--exclude "logs" \
--exclude "wordpress" \
--exclude "!wordpress/wp-content/wp-uploads" \
--exclude "!wordpress/wp-config.php" \
--exclude "/home/backup/source" \
--exclude "/home/backup/.*" >> $log_file 2>&1
echo "-------" >> $log_file
# Restic check of the NAS repo
restic -r sftp://[email protected]:/backups/pi/restic check \
--password-file $resticpw_file \
--read-data-subset=10% \
> /tmp/backup-check.txt 2>&1
tail -n 1 /tmp/backup-check.txt >> $log_file
echo "-------" >> $log_file 2>&1
# Restic backup to the Google using rclone
echo "" >> $log_file
echo "**Google**" >> $log_file
echo "" >> $log_file
restic -r rclone:GoogleDrive:/backups/pi/restic backup \
--password-file $resticpw_file \
/home \
/var/www \
--exclude ".git" \
--exclude "logs" \
--exclude "wordpress" \
--exclude "!wordpress/wp-content/wp-uploads" \
--exclude "!wordpress/wp-config.php" \
--exclude "/home/backup/source" \
--exclude "/home/backup/.*" >> $log_file 2>&1
echo "-------" >> $log_file
# Restic check of the Google drive repo
restic -r rclone:GoogleDrive:/backups/pi/restic check \
--password-file $resticpw_file \
> /tmp/backup-check2.txt 2>&1
tail -n 1 /tmp/backup-check2.txt >> $log_file 2>&1
echo "-------" >> $log_file
# Send a push notification of the backup and log file via ntfy.sh
curl -H "Title: Backup Pi to NAS" \
-H "Tags: pi,computer" \
-T $log_file \
https://ntfy.sh/my-secret-backup-topic > /tmp/ntfy.log 2>&1
I’ve chosen to omit a few files and directories from the restic backup which don’t need to be backed up in this way, which has made the restic command look more complex then it really is.
The files are encrypted with a key stored in ~/.secret/resticpw.txt which need to be stored securely in multiple places, as without it you can access the backup!
Mine key looks a bit like a Bitwarden fingerprint phrase – but you’ll have to forgive me for not going into any more details than this.
Speaking of Bitwarden, watch this space for all things password, coming soon.
The world is facing a severe crisis of environmental degradation and climate change that affects our ability to sustain human civilisation in its present form,
The main cause of the crisis is human activity,
The crisis is inextricably linked to global injustices, inequality and extinction of many species,
The crisis indicates a failure of human beings to follow God’s mandate to care for the world and to seek justice among its peoples,
we, the leaders of St Mark’s Church, Harrogate, want to publicly recognise a Climate and Environmental Emergency, and commit ourselves to:
Examining our lives individually and corporately in relation to this crisis and seeking to live faithfully to God,
Bringing forward by the end of 2023 an action plan to minimise our negative corporate impact on the environment and climate and to help restoration where possible,
Encouraging our members to make relevant lifestyle changes appropriate to their circumstances,
Encouraging action on this emergency in our neighbourhoods, workplaces and other spheres of activity,
Using whatever influence we may have to bring about positive actions by local and national government, corporations and other organisations.
You don’t need to work with technology for long before you realise the importance of having a backup strategy.
The two main use cases are disaster recovery, and mitigation against accidental deletion or edit.
The first is generally more straightforward – you are simply looking to be able to restore all your data in the case of hardware failure, or catastrophic user error. The scenarios are losing or dropping your phone or laptop, hard drive failure, memory stick loss or corruption, cloud provider failure, malware, accidentally deleting an account or formatting a hard drive, and so on. Furthermore, you also need to think about robbery, and flood or fire.
And let’s be clear – with any storage media, but especially hard disks, failure is a when not an if.
The received wisdom on this is to have a 3-2-1 plan. Have 3 copies of your data, 2 on different devices, and 1 offsite. It is suggested that a further ‘offline’ copy is also taken, so that should malware or ransomware hit and all connected copies are affected, there is a copy which you can be sure is secure.
My take is what one of my lecturers told me when I was a undergraduate – If your data doesn’t exist in 3 different locations, it doesn’t exist at all! Locations here meaning virtual, rather than physical, although the data does need to be in 2 physical locations.
TL;DR
I use sync.com (full disclosure – this is a referral link) to store all my documents and data (including e-mail backups).
In this way, I have at least 3 copies (which are kept in sync), spread across multiple devices, including offsite. Sync.com also offer file versioning and deleted file retrieval. Nice.
I do also have a NAS (Network Attached Storage) which has all my photos and videos, but this is also mirrored on Sync.com.
Backing up
My main backup strategy used to be a combination of a NAS drive and USB memory sticks. The NAS has two hard disks setup in a RAID-1 configuration, so the data is mirrored over both disks. If either disk fails, it can be replaced and will automatically re-mirror from the other one. It relies on the likelihood of both disks failing at the same time being low, which it is. The slight hesitation is that I bought both hard disks at the same time, so they are both likely to fail around the same time.
I had a script which mirrored the NAS onto one of my PC hard disks, and then periodically I would back it all up to USB memory sticks which I kept in a fireproof safe. The NAS is also useful in terms of documents which are shared (like utility bills, and photos).
This was fine as far as it went. The NAS took take of 2 of the copies on it’s own, but all the copies of the data were in the same physical location, and it relied on me being bothered to save to the USB sticks regularly, which I wasn’t great at. It also was limited in terms of recovery from accidental deletion.
So instead I now use the cloud for backup storage.
Google Drive, OneDrive, Dropbox and other storage providers have a very robust infrastructure, with multiple geographically distributed copies. I personally wouldn’t rely solely on these, but as most of them sync a copy to your hard drive, even if (say) Microsoft goes go down you haven’t lost it all. Plenty of people do rely on them, and they are whole lot better than no backup!!!
My issue with this is that Microsoft/Google/Dropbox can read your data. For some stuff I’m not too fussed about this, and they are an excellent way of sharing photos or distributing a newsletter. But I don’t really want Dropbox having access to my bank statements, say.
Sync.com
Instead of these I now use Sync.com. They are a zero knowledge cloud data storage provider, which means I am the only one who can access my data. It integrates with Windows and MacOs like OneDrive, so that changes are automatically synced up to the cloud.
Their free account is pretty good – 5GB of storage, which you can extend to 10GB fairly easily by getting rewarded for various actions, like installing it on a phone. If you refer a friend, you also get an extra 1GB each time. They also provide file versioning, so you can restore an older or deleted file. My family members have free accounts, and Sync.com’s excellent sharing facilities allows me to share documents, and lets them to use ‘my’ 2TB of storage with my paid plan.
I opted for a paid plan, which is $96 a year, for 2TB of storage. This is more storage than I will need for some time (my NAS also has 2TB capacity, but I’m only using 500GB). All my local documents on Windows are automatically synced with Sync.com, which satisfies my 3-2-1. The stuff on the NAS still gets mirrored to the Hard Disk, but the active folders also get mirrored to my Sync.com space.
Sync.com isn’t perfect – the desktop client is a bit clunky, there’s no API or Linux client (which is a nuisance). But in terms of value and getting zero-trust encryption it ticks my boxes, plus it’s great for sharing, and really good to get file versioning and delete recovery.
NAS backup scripts
All the copying is managed using Task Scheduler and (e.g.) Robocopy to mirror the NAS into my Sync.com directories. The scripts themselves are a simple batch file, such as this one, which mirrors a shared folder from the NAS onto my local D: drive.
The upshot is, all my documents are stored on my local hard disk, and also on Sync.com.
All my photos and videos are stored on my NAS, but mirrored to my local hard disk, and also uploaded to Sync.com.
That just leaves e-mail.
E-mail backups
The final piece of the jigsaw is e-mail, which is primarily stored on my e-mail provider’s IMAP server, and is partially replicated on my hard disk by my e-mail client.
Rather than assume anything about my e-mail client’s (or provider’s!) retention strategy, I manually sync all my e-mail accounts to a folder, which is in turn synced with Sync.com. I don’t bother with my Microsoft or Google e-mail addresses (I figure they have probably got that covered), but the addresses at eutony.net I do back up.
This is a little more technical as it needs a tool to do the IMAP mirroring – I use imap-backup running in a Docker container (so I don’t need to fight to the death with Windows over installing ruby, and all the scripts!!)
The Dockerfile spins up an ubuntu image with imap-backup installed:
FROM ubuntu:latest AS build
ENV HOME /root
SHELL ["/bin/bash", "-c"]
RUN apt-get update && apt-get -y --no-install-recommends install ruby
RUN gem install imap-backup
RUN adduser --system --uid 1000 --home /home/imapuser --shell /bin/bash imapuser
RUN mkdir /imap-backup && chown imapuser /imap-backup
USER imapuser
ENV HOME /home/imapuser
WORKDIR /home/imapuser
RUN mkdir .imap-backup && chmod og-rwx .imap-backup
COPY --chown=imapuser config.json .imap-backup/config.json
RUN chmod 0600 .imap-backup/config.json
CMD ["imap-backup", "backup"]
The only piece of magic is copying config.json, which has the account configurations, and looks a bit like this, with sensitive information removed.
The docker-compose.yml then mounts a local Windows directory as /imap-backup, so the script can save the data locally. As this folder is under my Sync.com folder, the data gets automatically stored and versioned in the cloud.
Lastly, we just need a Scheduled Task to run docker compose up periodically.
Restore
Of course, backups are only any use if you can restore them.
With a cloud provider based approach (such as Sync.com), the files are just ‘there’. Accessing them is via the web client, or phone all, and restoring them on a new device as simple as installing the desktop client and letting it sync.
Imap-backup backs up in a standard text-based format on the disk, but also supports ‘restoring’ to a new IMAP account.
Logging
Last thing to mention is the important of logging and checking your backups. Scripts go wrong, get de-scheduled, etc. You don’t want to find this out after you’ve lost everything.
My approach is to have every backup script called by a wrapper script than handles logging what’s going on. This wrapper script is invoked by the Task Scheduler.
@echo off
echo [%date% - %time%] Backup start > "%~dp0\log.txt"
CALL "%~dp0\backupnascore-photos-d.bat" >> "%~dp0\log.txt" 2>&1
echo [%date% - %time%] backup finished >> "%~dp0\log.txt"
curl -H "Title: Backup Photos from NAS to D Drive" -H "Tags: win11,computer"-T "%~dp0\log.txt" https://ntfy.sh/my-ultra-secret-backup-topic
The sharp-eyed will notice a curl call to ntfy.sh. This is simply a way to ping the backup result to my phone, so I can scan the logs for errors, and hopefully notice if I haven’t received one for a whole. I actually self-host my own ntfy instance, but I started off using ntfy.sh, and it works really well.
But wait, there’s more…
I don’t only have a Windows box, but also a Linux box which runs all my databases.
As I mentioned last time, the config and code is all in source control, so automatically backed-up. However the database and media files associated with the websites also need backing up, which is what I will cover next time…


